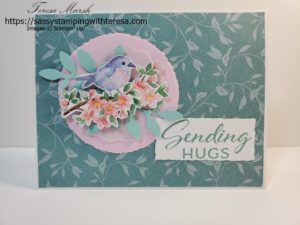
In this week’s Thursday live I chose to use a new Sale-a-bration paper along with some other current items in my stash to create a colorful feminine card. The new item was Designer Series Paper that I got for FREE. It’s available free to you as well as a Sale-a-bration gift option.
What is Sale-A-Bration?
Sale-a-bration is a special event here that offers an opportunity to earn free gifts with qualifying purchases. There are several “level 1” gifts that you can select from if you make a 50-dollar purchase and some “level 2” gifts that you can choose if your order is $100 or more. You can check out the catalog here if the link on the side bar is not working.
Sale-a-bration is now in full swing until the end of February, so I wanted to share a card made with one of the Designer Series Paper packs. For my Thursday Live on the 18th I chose to use the Flight & Airy Designer Series Paper that is a free gift with purchase option in the current Sale-a-bration catalog. This paper has some gorgeous bird images that really lend themselves to becoming a focal image on a card with a bit of fussy cutting.
This card design is a wonderful one that can be used for a variety of purposes, much as you would use a “thinking of you” card. While today’s paper choices are pretty feminine, this collection also includes options that could be used for a man’s card as well.

If you’d like to see how this all came together, you can watch the video here. If you’re more of a print preferred type, just scroll down for the supply list and instructions.
Supplies used:
- STAMPS: Layering Leaves
- INK: Lost Lagoon
- PAPERS: Flight & Airy Designer Series Paper (DSP) and Card Stock in the colors of Basic White, Soft Sea Foam and Bubble Bath. Also used was the Vellum Card Stock.
- OTHER SUPPLIES: Punches (Decorative Circle and Bough), Dies (Deckled Circles and Deckled Rectangles), Paper Trimmer, Paper Snips, Stampin’ Seal, liquid glue, Stampin’ Dimensionals
Steps:
- Cut Basic White Card stock at 5 1/2 x 8 1/2, score at 4 1/4. Fold and burnish.
- Prepare your card layer: Cut your Designer Series Paper at 5 3/8 x 4 1/8; attach to card base.
- Die cut pieces: Cut Bubble Bath circle using the 6th from the center of the Deckled Circles Dies. Using a scrap of Basic White, cut the second from smallest Deckled Rectangle; stamp sentiment in Lost Lagoon.
- Punch decorative circle from Vellum and Boughs from Soft Sea Foam.
- Fussy cut from the DSP your chosen bird image to use as a focal image.
- Assemble the layers of your focal image and attach to card base; attach sentiment.
I’d love to share a printable instruction sheet for this card with you. Just drop a comment below that you’d like the printable and join my email list (on the right) so that I can send one to you!

