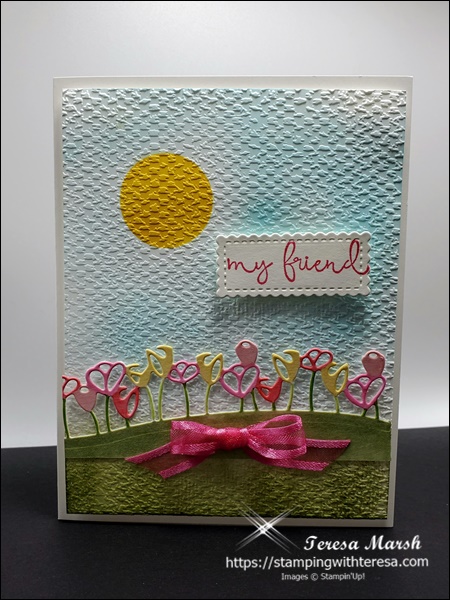
There are so many cute images and stamps this spring! I couldn’t resist mixing them up some for a general spring card to a friend. I decided to a textured card sending spring wishes.

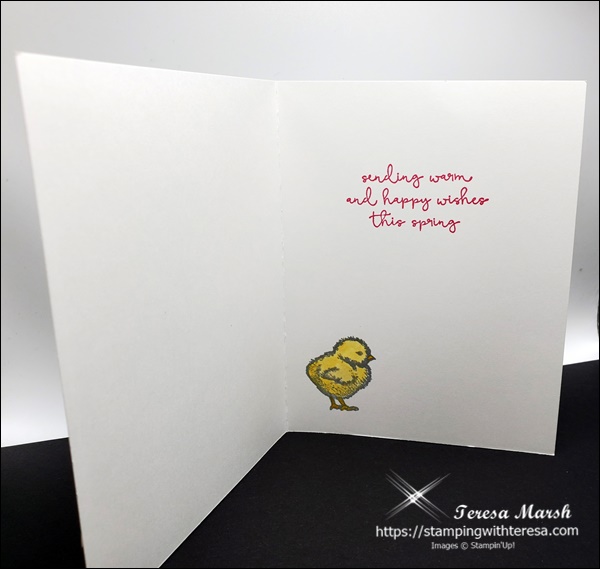
The front turned out so cute, I couldn’t resist decorating the inside just a bit as well!

Steps to make the card
Creating a Card front with texture
- Cut your Basic White: a) one piece for card base at 5.5 inches by 8.5 inches – score at 4.25. b) two pieces measuring 5.25 x 4.0 inches c) a strip of white 2 x 5 to use for the tulip border and d) scrap for sentiment.
- Die cut the tulip border. Color with Stampin’ Blends: I used Mossy Meadow for the base and for the flowers I used Daffodil Delight, Flirty Flamingo and Polished Pink, I colored the flower stems with Granny Apple Green, using light for some and dark for others. Set aside
- Cut the sentiment label using the smallest rectangle from the Stitched so Sweetly dies.
- For your scene, using one of the 5.25 x 4 pieces of white die cut a circle where you want your sun to be (I used the smallest circle in the Layered Circles Die set). Placing this over the other 5.25 x 4 piece, use your blending brush to apply color (Daffodil Delight). Take the circle that was die cut out, and using temporary adhesive, place it over your sun. Using another blending brush, apply sky color. Apply grass color (if needed) in a similar fashion.
- Place the scene paper into the Tasteful Textiles embossing folder and run it through the Stampin’ Cut and Emboss machine to create the texture on the front panel.
- Adhere tulip border to embossed paper at appropriate height.
- Stamp “my friend” from the Easter Friends stamp set onto the rectangle label.
- Attach scene to card base with dimensionals; attach greeting rectangle with dimensionals.
- Tie bow using Polished Pink Open Weave Ribbon; attach to front of card with glue dot.
Finishing the inside of the Spring Wishes card
Inside the card, I stamped another sentiment greeting from the Easter Friends stamp set in Polished Pink. I stamped the small chick from the same set in the lower corner inside using Smokey Slate. Using a water brush (mostly dry), I picked up some Daffodil Delight from the ink pad and colored the chick. I used the same technique for his feet and bill using Crushed Curry.
I hope you enjoy making this Spring Wishes Textured Card. Check the blog for more card ideas to come, or sign up for the newsletter to keep you informed of all that’s new here.
Supplies used
- Easter Friends Cling Stamp Set (English) – 157737
- Tulips Dies – 157677
- Stitched So Sweetly Dies – 151690
- Layering Circles Dies – 151770
- Balmy Blue Classic Stampin’ Pad – 147105
- Mossy Meadow Classic Stampin’ Pad – 147111
- Polished Pink Classic Stampin’ Pad – 155712
- Polished Pink 3/8″ (1 Cm) Open Weave Ribbon – 155714
- Smoky Slate Classic Stampin’ Pad – 147113
- Daffodil Delight Classic Stampin’ Pad – 147094
- Crushed Curry Classic Stampin’ Pad – 147087
- Stampin’ Dimensionals – 104430
- Tasteful Textile 3D Embossing Folder – 152718
- Polished Pink Stampin’ Blends Combo Pack – 155520
- Daffodil Delight Stampin’ Blends Combo Pack – 154883
- Flirty Flamingo Stampin’ Blends Combo Pack – 154884
- Mossy Meadow Stampin’ Blends Combo Pack – 154890
- Granny Apple Green Stampin’ Blends Combo Pack – 154885
- Water Painters – 151298
- Stampin’ Seal – 152813
- Mini Glue Dots – 103683
- Stampin’ Cut & Emboss Machine – 149653
- Blending Brushes – 153611
- Take Your Pick – 144107
- Paper Trimmer – 152392
- Clear Block size D – 118485


Lovely card Teresa!!!
Thanks, Kristie!!